
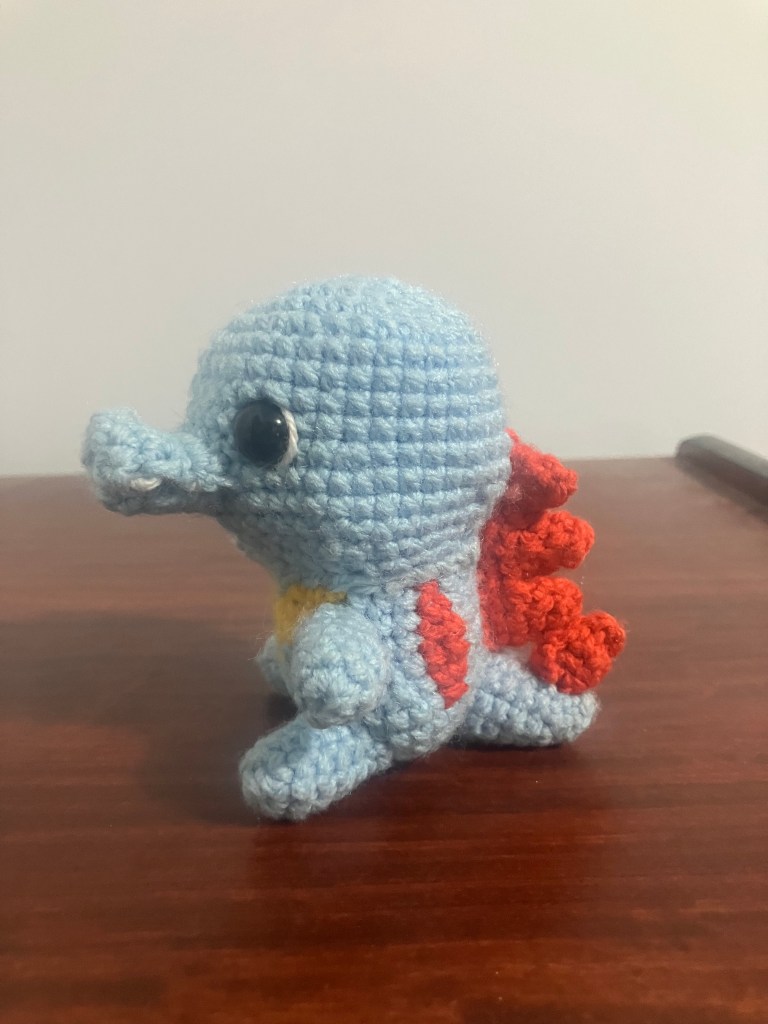
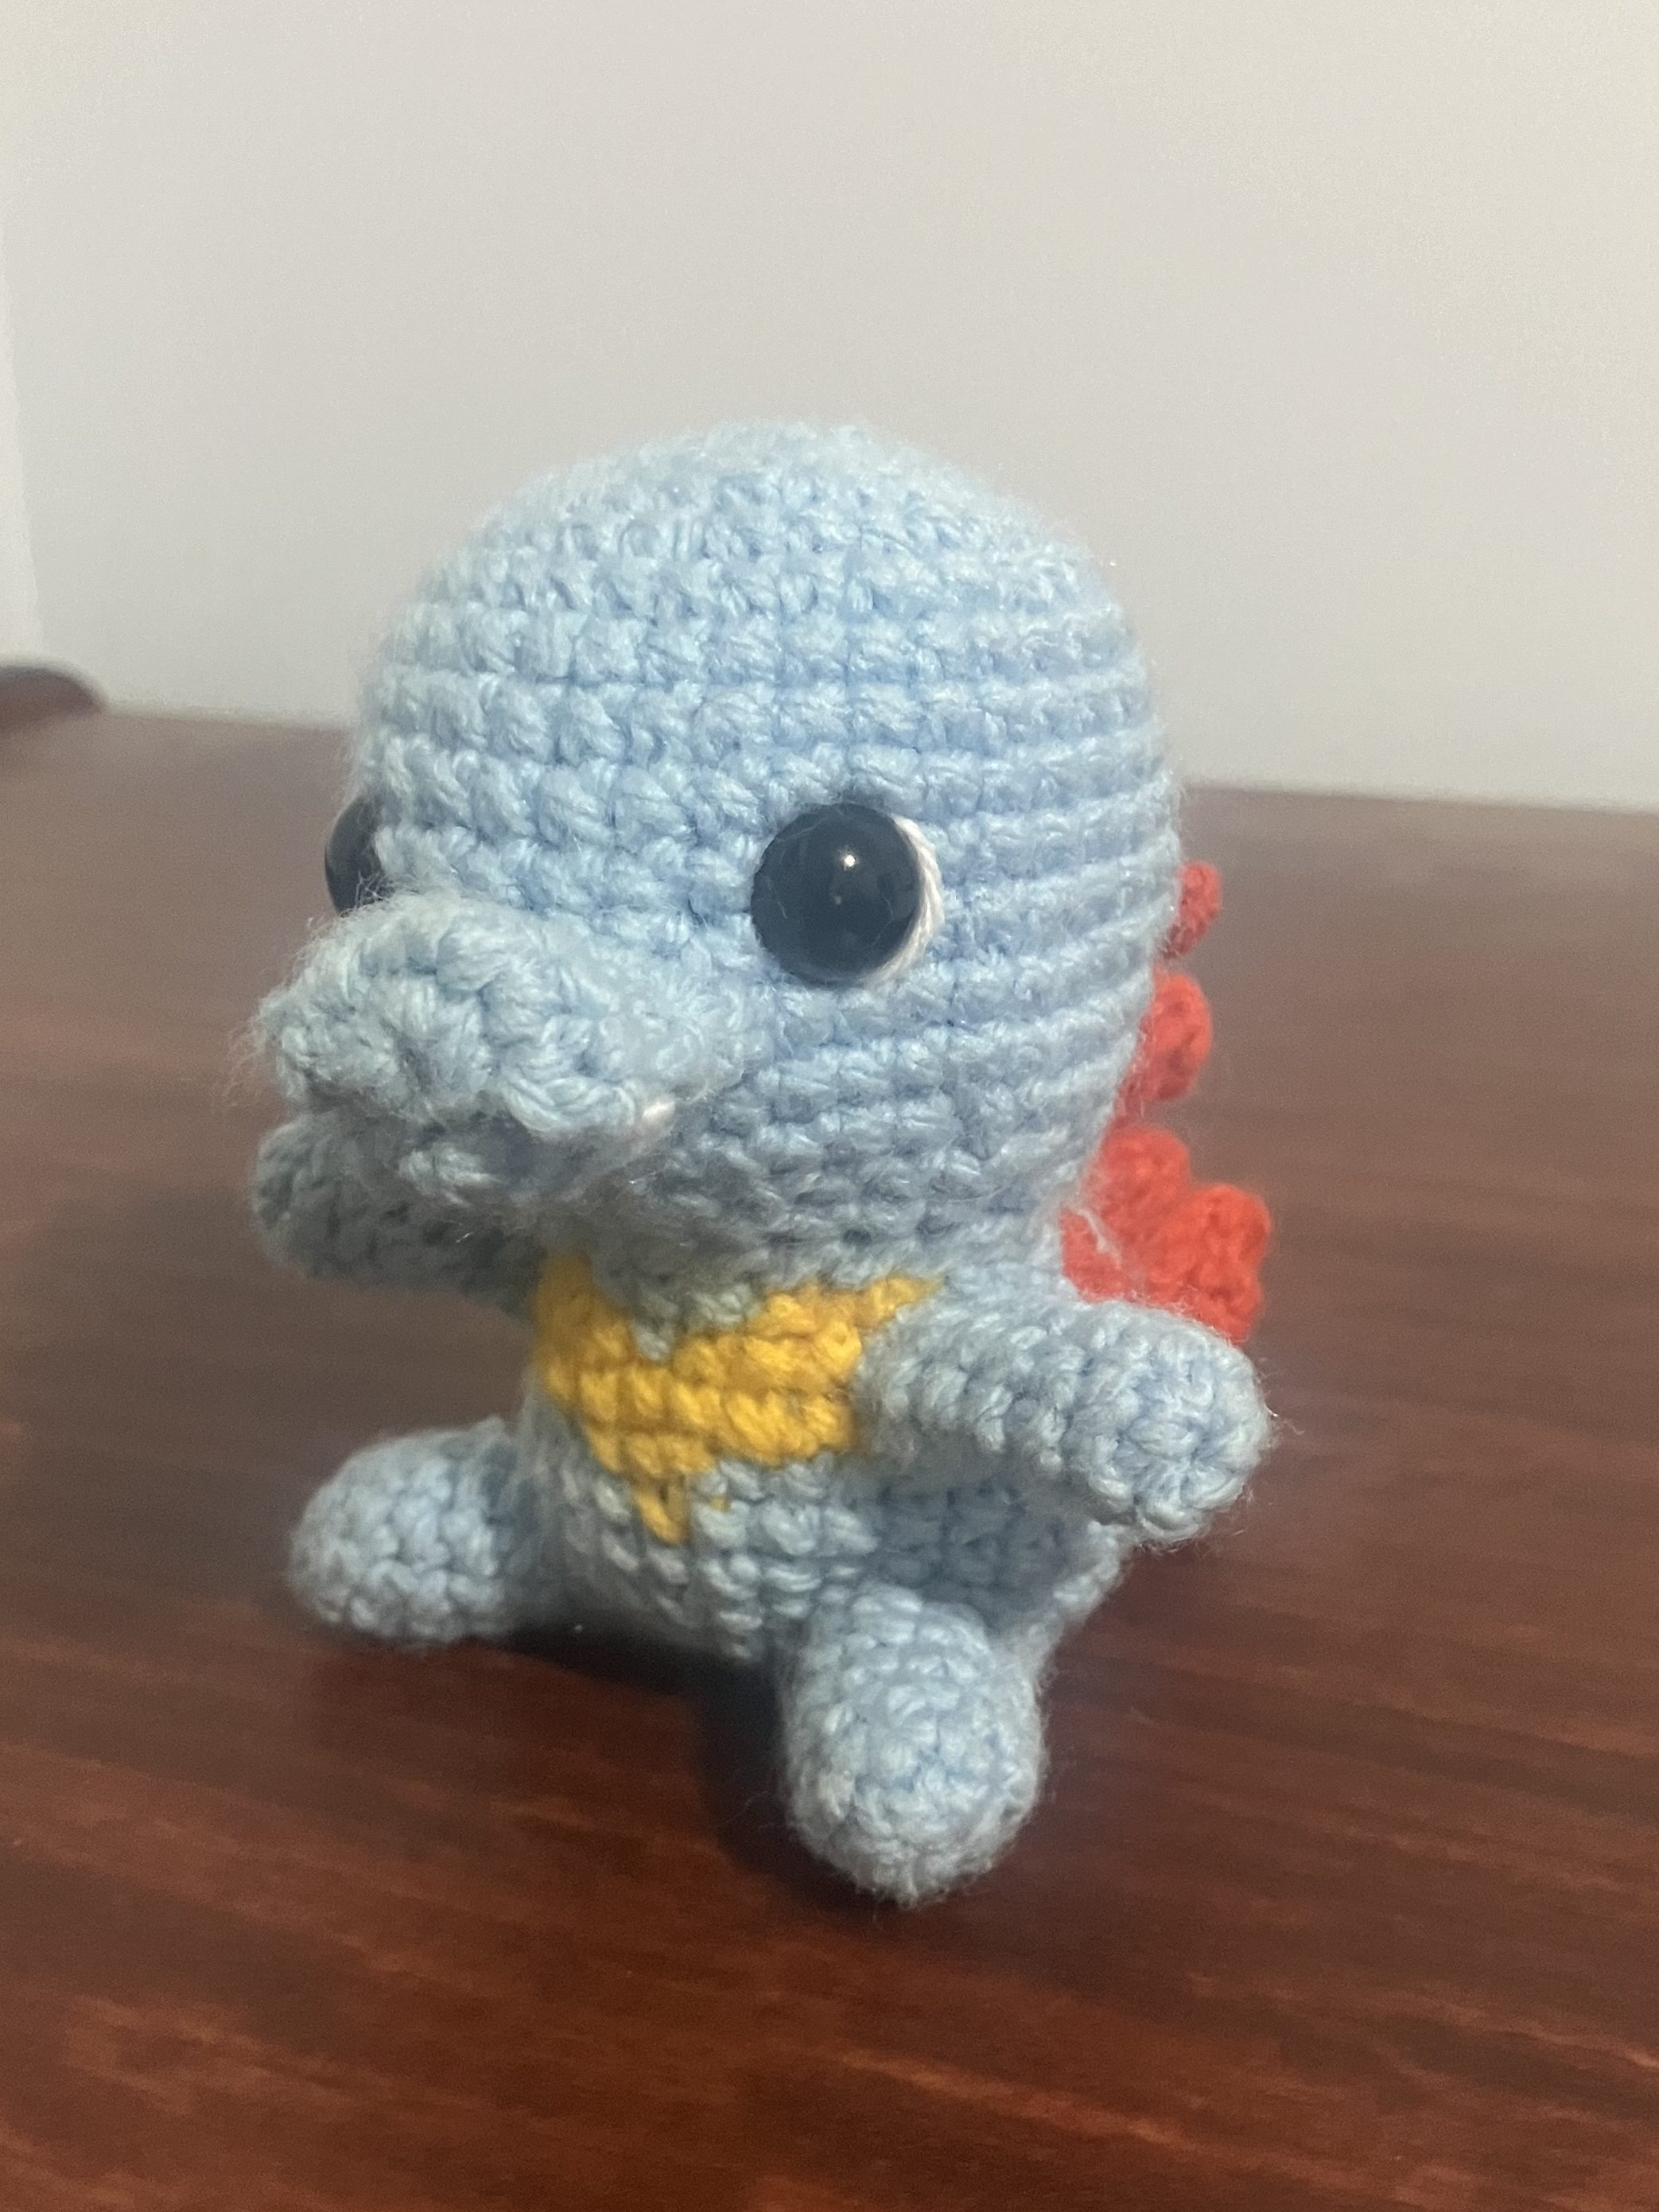
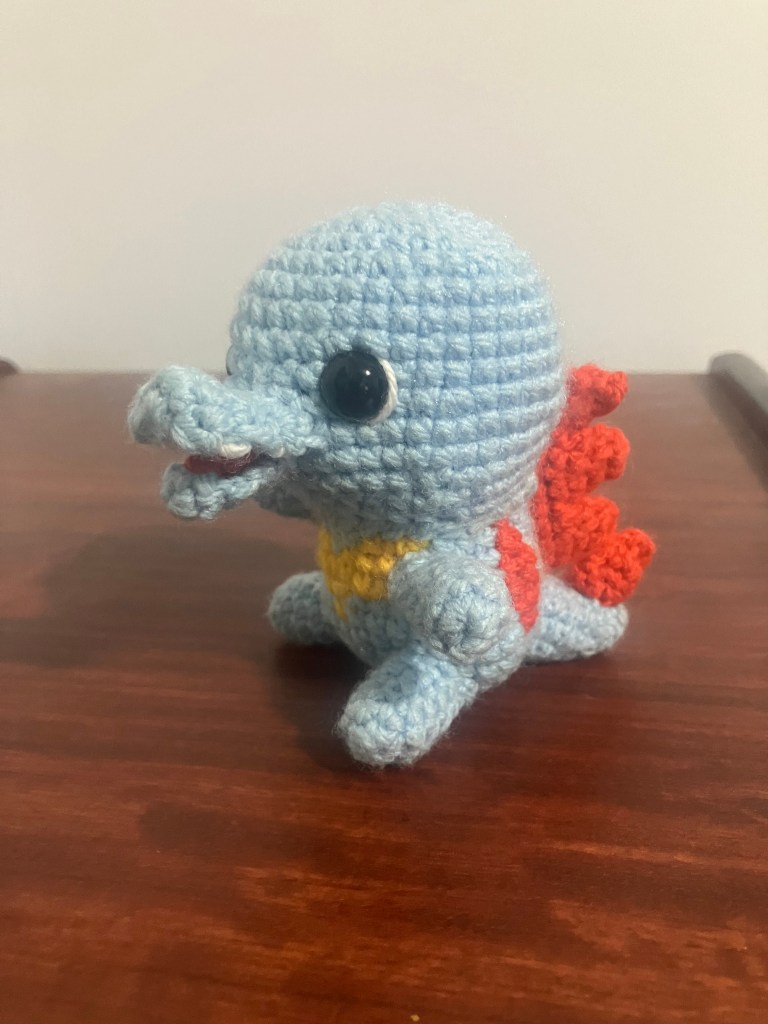
So Pokémon Silver was the first Pokémon game I played as a kid and while Totodile was not my first choice I did do multiple play throughs and as an adult he is one of my favourite. He was also a special request from my best mate and while this guy got the tick of approval from him I hope he gets the same from you!
Doing this pattern was a little difficult as in trying to keep with the theme of rounder cute heads I had to make a call on changing his mouth and eyes to fit this theme. After multiple attempts I landed on something that I’m happy with. You get the idea it’s suppose to be Totodile but it still has that cute factor to it.
I do want to come back and revisit this Pokémon to complete an actual look a like but I’ll leave this until the future.
This pattern is a little more technical and that’s mainly because there is a lot of colour changes for the body so you need to be comfortable doing this.
If you would like to support me on my Crochetdex Adventure please check out my Patreon here. You’ll get access to all my pattern pdf’s which usually include more reference images, voting suggestions, pattern testing and early access

Abbreviations (US):
Sc: Single crochet
MR X: Magic Ring with X amount of sc in it
Ch: Chain
ss: Slip stitch
Hdc: Half double crochet
Dc: Double crochet
Inc: Increase
Dec: Decrease
HccX>Y: Half colour change single crochet – complete the tower of the crochet in X colour & loop in Y colour
Hcc-incX>Y: Half colour change increase – complete first crochet in X colour then complete a Hcc in same loop
Hcc-decX>Y: Half colour change decrease – complete tower of crochet in X colour & loop in Y colour
dc – double crochet.
R: Round
Finish Off: Place at least one ss or until you’re happy with it and slip knot to fasten off & create tail.
X(…) : Repeat stitches within parentheses X times
X[Skip]: Skip X stitch
Tools and Materials:
- 3.5mm Crochet hook
- tapestry needle and scissors
- polyester fiberfill stuffing
- 12 mm safety eyes
- Yarn 8PLY/DK: I used Panda 8PLY 100% acrylic Magnum
- Light Blue (B) –
- Red (R) –
- Yellow (Y) –
- (Optional) White –
Final Size: 11cm tall
Technical Notes and Gauge:
- If there is something specific about a section as a whole I will note it at the top of the section and it is only applicable to that section. If there is something specific about a stitch within the section I will flag with a * and please refer to the bottom of that section for details and this is only applicable to that section.
- Crochet in continuous spiral rounds, unless specified otherwise. Use a stitch marker or piece of yarn to keep track of the last stitch in each round. I usually pull the tail of the MR through when needed as my stitch marker.
- This pattern has colour changes within the row. You need to be comfortable completing these. Remember we swap colours during the stitch before the noted change.
- Hcc are used when I want to intentionally place a loop in a different colour for the next row. I will not be noting hcc for the sc before noted colour change
- If multiple colours are used I will note in superscript which colour to complete the crochet in. eg. 2scY, scG, 3scY = x2 sc in yellow, x1 in green then x3 in yellow
- Please ensure you change colours appropriately to account for multiple colours in one row:
- above example = x1 full yellow, hcc to green, hcc to yellow, x3 full yellow
- The exception to this is when a hcc-inc is applicable. I will always note these.
- If I do not note the colour of a row/crochet assume it is the same colour as the previous row/crochet
- Please ensure you change colours appropriately to account for multiple colours in one row:
- When filling with polyester stuffing, pull apart each large chunk into many smaller chunks. This ensures an even distribution of firmness within the amigurumi.
- Use sewing pins to secure limbs of the amigurumi before you sew them.
- Gauge: 5 rows of 5 sc = 1” x 1” or ~2.5cm x 2.5cm
- Stitch count will be summarized at the end of each row in brackets
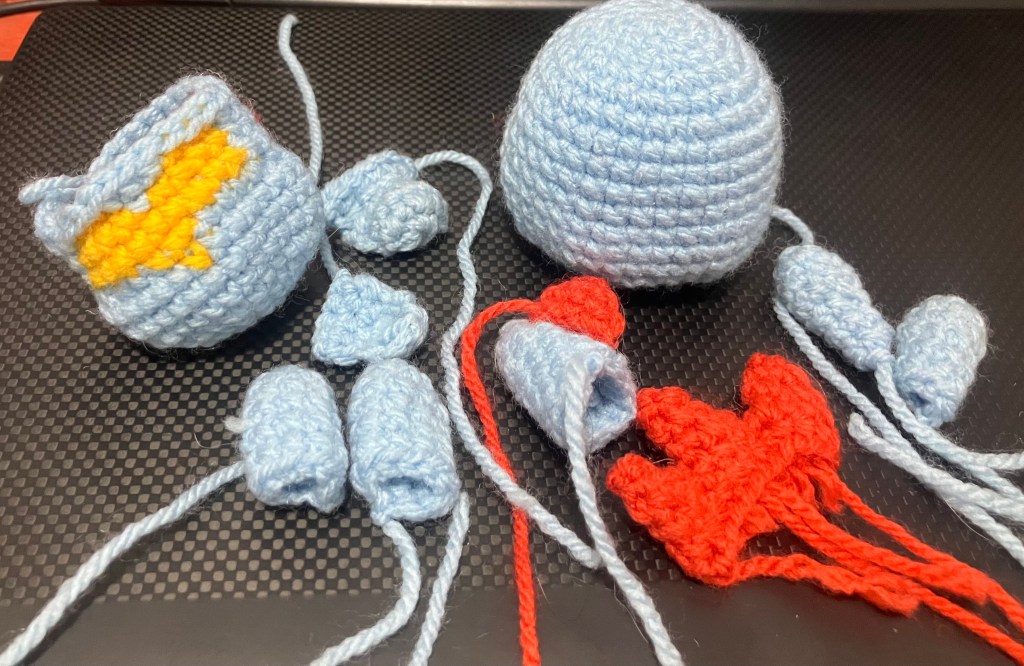
- There are some images at the end of this pdf to help you with certain sections. Please refer to them if you struggle/want reference for any parts – will be noted as (Fig X) at end of Row/sentence.
Head
Make 1 – Colours: Light Blue
- R1: MR 6 (6)
- R2: inc x6 (12)
- R3: 6(inc, sc) (18)
- R4: 6(inc, 2sc) (24)
- R5: 6(inc, 3sc) (30)
- R6: 6(inc, 4sc) (36)
- R7-10: 36sc (36)
- R11: 6(inc, 5sc) (42)
- R12-13: 42sc (42)
- R14: 6(dec, 5sc) (36)
- R15: 6(2sc, dec, 2sc) (30)
- R16: 6(dec, 3sc) (24)
Finish off. Leave enough tail to attach to body
Body
Make 1 – Colours: Light Blue, Red, Yellow
Note: I usually use two separate strands of red for this part to reduce yarn wastage – I cut ~ 40-50cm. This is not necessary.
- R1: MR 6 (6)
- R2: inc x6 (12)
- R3: 6(inc, sc) (18)
- R4: 6(inc, 2sc) (24)
- R5: 6(inc, 3sc) (30)
- R6: hccB>R, 8sc, hccB>R, 20sc (30)
- R7: scB, scR, 8scB, scR, 19scB (30)
- R8: scB, hcc-incR>B, scB, dec, 5sc, hcc-incR>B, scB,, dec, 6sc, scY, 9sc (30) Fig X
- R9: scB, 2scR, 7scB, 2scR, scB, dec, hcc-decB>Y, 3[hccB>Y], incY*, scY*, hcc-decB>Y, hccB>Y, 2[dec]B, sc (26)
- R10: scB, 2scR, 7scB, 2scR, 3scB, 9scY, 2scB (26)
- R11: scB, hcc-decR>B, 7scB, hcc-decR>B, 3scB, 2scY, 2[hccY>B], scB*, 4scY, 2scB (24)
- R12: scB*, hccR>B, 7scB, hccR>B, 3scB*, hccY>B, 3scB*, 3hccY>B, 2scB (24)
Finish off. If you’re worried about the loose ends of yarn from each colour you should have 4 loose ends you can tie together.
*This is a one colour stitch
Top Jaw
Make 1 – Colours: Light Blue
Note: For this section you either need to turn at the end of each round or alternate crocheting backwards and forwards. Personally I do the latter so my stitches can all look the same. I will note below which rounds are reversed (Rv). If you have difficult doing it in reverse for inc & dec only then turn between R1-2 & this won’t impact piece much.
- R1: MR 6 (6)
- R2: ch, 2(inc, sc), inc (8)*
- R3: ch, 8sc (8)
- R4: ch, sc, 3[dec], sc (5)
- R5: ch, 5sc (5)
- R6: ch, inc, 3sc, inc (7)
Finish off by placing a ss into the same loop as the last inc in R6. Leave enough tail to attach to the head.
Bottom Jaw
Make 1 – Colours: Light Blue
Note: For this section you either need to turn at the end of each round or alternate crocheting backwards and forwards. Personally I do the latter so my stitches can all look the same. I will note below which rounds are reversed (Rv).
- R1: MR 5 (5)
- R2: ch, 5sc (5)
- R3: ch, 2sc, dec, sc (4)
- R4: ch, 4sc(4)
Finish off by placing a ss into the same loop as the last sc in R4. Leave enough tail to attach to the head.
Legs
Make 2 -Colours used: Light Blue
- R1: MR 6 (6)
- R2: 3(inc, sc) (9)
- R3-6: 9sc (9)
Finish off and leave enough tail to attach to the body
Arms
Make 2 -Colours used: Light Blue
- R1: MR 6 (6)
- R2: 2(inc, 2sc) (8)
- R3-4: 8sc (8)
- R5: dec, 6sc (7)
- R6: 7sc (7)
Finish off and leave enough tail to attach to the body
Tail
Make 1 – Colours: Light Blue
- R1: MR 6 (6)
- R2: 6sc (6)
- R3: 2(inc, 2sc) (8)
- R4: 2(inc, 3sc) (10)
- R5: inc, 9sc (11)
- R6: inc, 10sc (12)
- R7: 12sc (12)
Finish off leaving enough tail to attach to the body.
Back Spikes
Make 1 – Colours: Red
Note – this piece has multiple sections that all attach to the base piece. We do not insert the middle & last spine into any used loops.
Base & First spike
R1. Ch x22, ss into first ch to create a circle (22)
R2. sc x22, ss (22)
R3. sc x3, ch, skip 15, sc x4 (8)
R4. Sc, dec, sc x2, dec, sc (6)
R5. (Dec, sc) x2 (4)
R6. Finish off & loop thread through front loops of each stitch & pull strand through centre & pull close – like a drawstring bag
Middle Spike
Start in next crochet on base
R1. Sc x4, ch, skip 7, sc x4, ch (10)
R2. Sc, dec, sc x3, dec, sc x2 (8)
R3. Sc, dec, sc x2, dec, sc (6)
R4. (Dec, sc) x2 (4)
R5. Finish off & loop thread through front loops of each stitch & pull strand through centre & pull close – like a drawstring bag
Last Spine
Start in the next crochet on base
R1. Sc x7, ch (8)
R2. Sc, dec, sc x2, dec, sc (6)
R3. (Dec, sc) x2 (4)
R4. Finish off & loop thread through front loops of each stitch & pull strand through centre & pull close – like a drawstring bag
Tail Spike (made as a separate piece)
Colour – Red
R1. Ch 10, ss into first ch (10)
R2. Sc x10 (10)
R3. Sc, dec, sc x3, dec, sc x2 (8)
R4. Sc, dec, sc x2, dec, sc (6)
R5. (Dec, sc) x2 (4)
R6. Finish off & loop front loops of each stitch & pull strand through centre & pull close
Assembly
I personally like to attach the head & body together so I can attach all the other parts in line and accurately. It can be a little difficult at times to attach the arms but if you leave an opening in the head-body & remove the stuffing of the head when attaching this section it might make it easier. Otherwise
attach legs, arms and tail first then proceed with the next sections as written as you need the head & body attached for the back spikes.
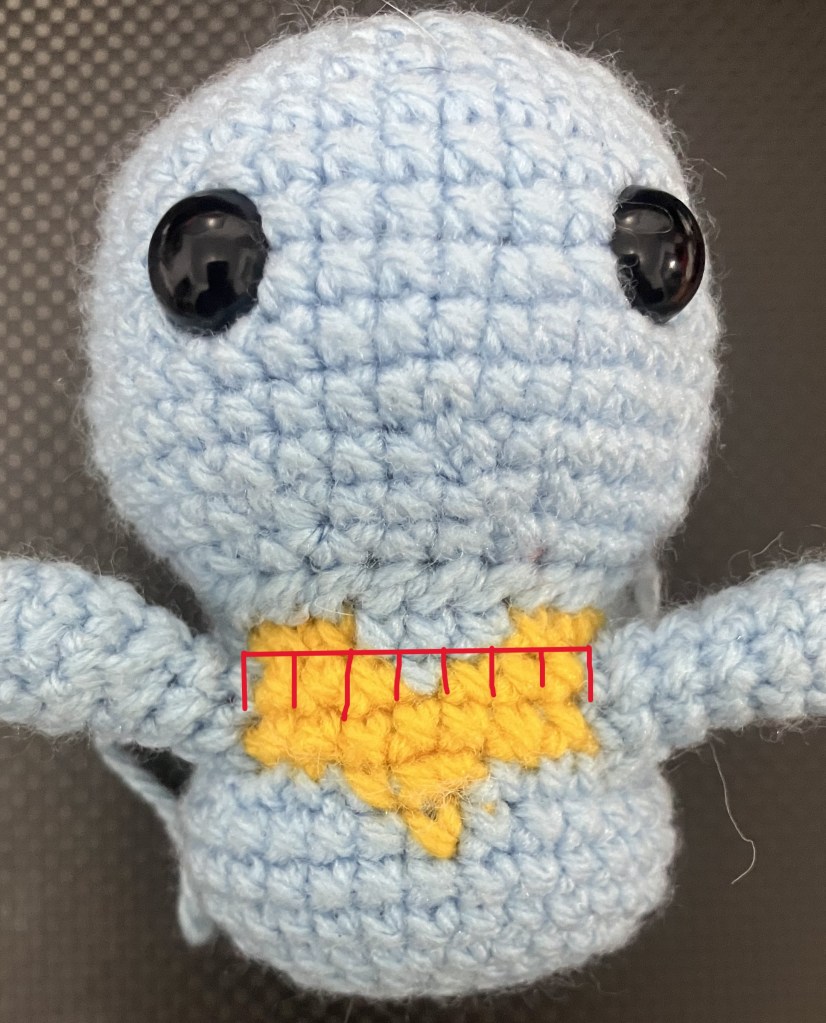
Stuff head & body with stuffing. Find the best side where you would like to attach the eyes to the head, for me it is usually the opposite side to where I finished the last round of the head piece. Place eyes in between rows 10 & 11. I usually like to leave visually 6 sc between eyes & this usually ends up being 8 crochets total. However you can position to your liking. Attach the head to the body ensuring that the eyes are placed on the same side of the yellow. They should fall evenly on each side of the yellow chest. I usually start attaching the head and once I am happy with how it looks I clip in the eyes.
Position the arms centred on the colour change from yellow to blue on each side. It should cover the 6 crochets that form this colour change on rows 10-12. There should be 7 crochets distance between the two arms. You shouldn’t need to stuff the arms prior to attaching.
The legs are positioned 3 rows below the arms on rows 4-6 approximately 6 crochets apart from the 5th and 6th row. These I like to stuff.
Next I would recommend placing the tail. Prior to attaching this piece to the body attach the tail spike. I place this on rows 2-4 but you can adjust to your liking. Make sure you flatten this prior to attaching as we don’t want a cylindrical spike. Stuff the tail and attach on rows 2-5 of the back, placed
centrally between the two red markings. It should not enter the same row as the start of the full red sc on the back.
The back spines are positioned in the exact middle of the two red back lines covering one sc only and when attaching then go from the base of the tail to partway up the head.
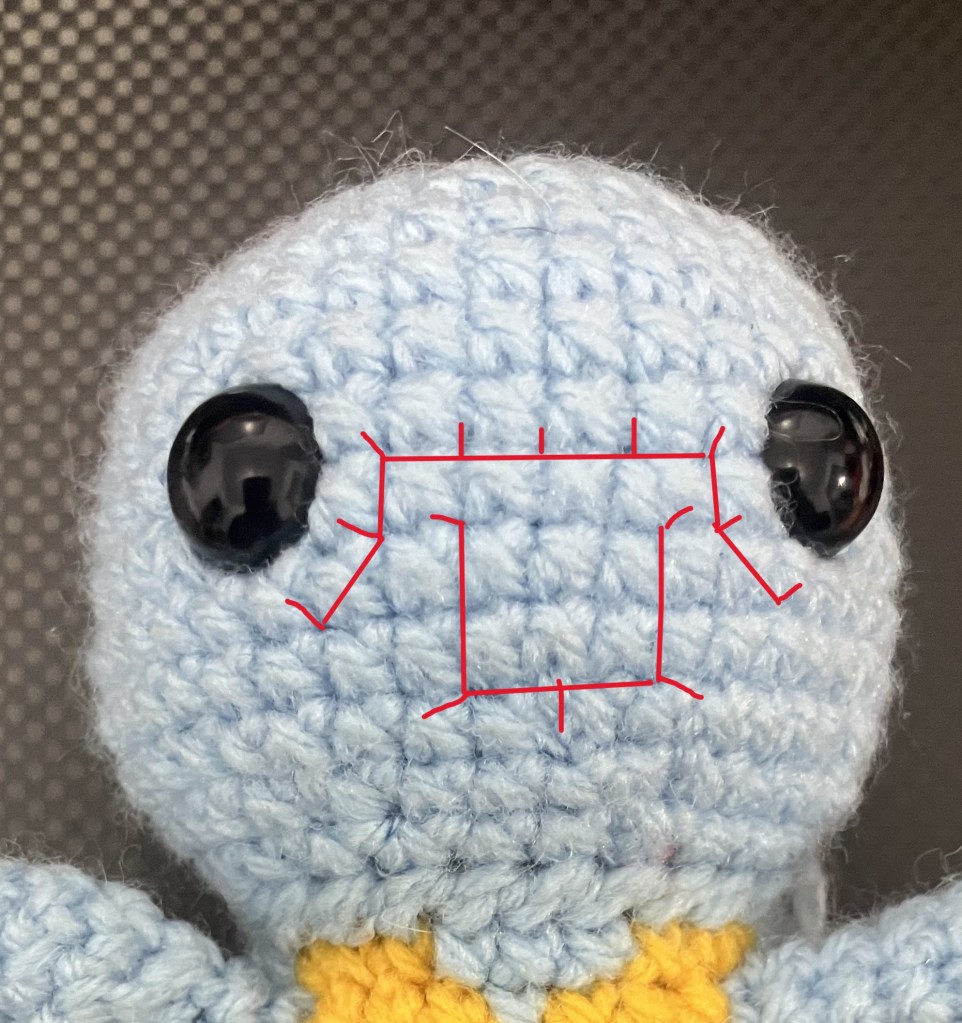
Lastly the jaws. I place the top jaw first so I can position the bottom one within it. Place the top jaw so it starts on the bottom internal corner of the innermost sc under the eye (rows 12 & 13). You do two sc diagonally up then four sc across before going diagonally down two to finish off. For the lower jaw you start on the bottom internal corner of the crochet one more centrally to the one you start on or the top jaw.
Optional
To attach the tongue tie the two tails together once to bring the tongue together. Attach it so it fits snugly into the lower jaw.
Finally if you want to add a bit of extra cuteness you can use some white yarn to add a semi-circle strand to the outer side of the eyes and some teeth. The teeth are complete between rows 3&4 and 5&6.
That’s it – Totodile is all done! I hope you enjoyed crocheting it and found the pattern helpful. I would love to see your finished amigurumi, so share a picture on social media with me by tagging me @dans_crochet_adventure. Once again, if you have any questions don’t hesitate to reach out to me
through email at danscrochetadventure@gmail.com or reach out to me on my socials. Happy crocheting! ♥
wow!! 101Lucario – the Aura Pokémon

Leave a comment