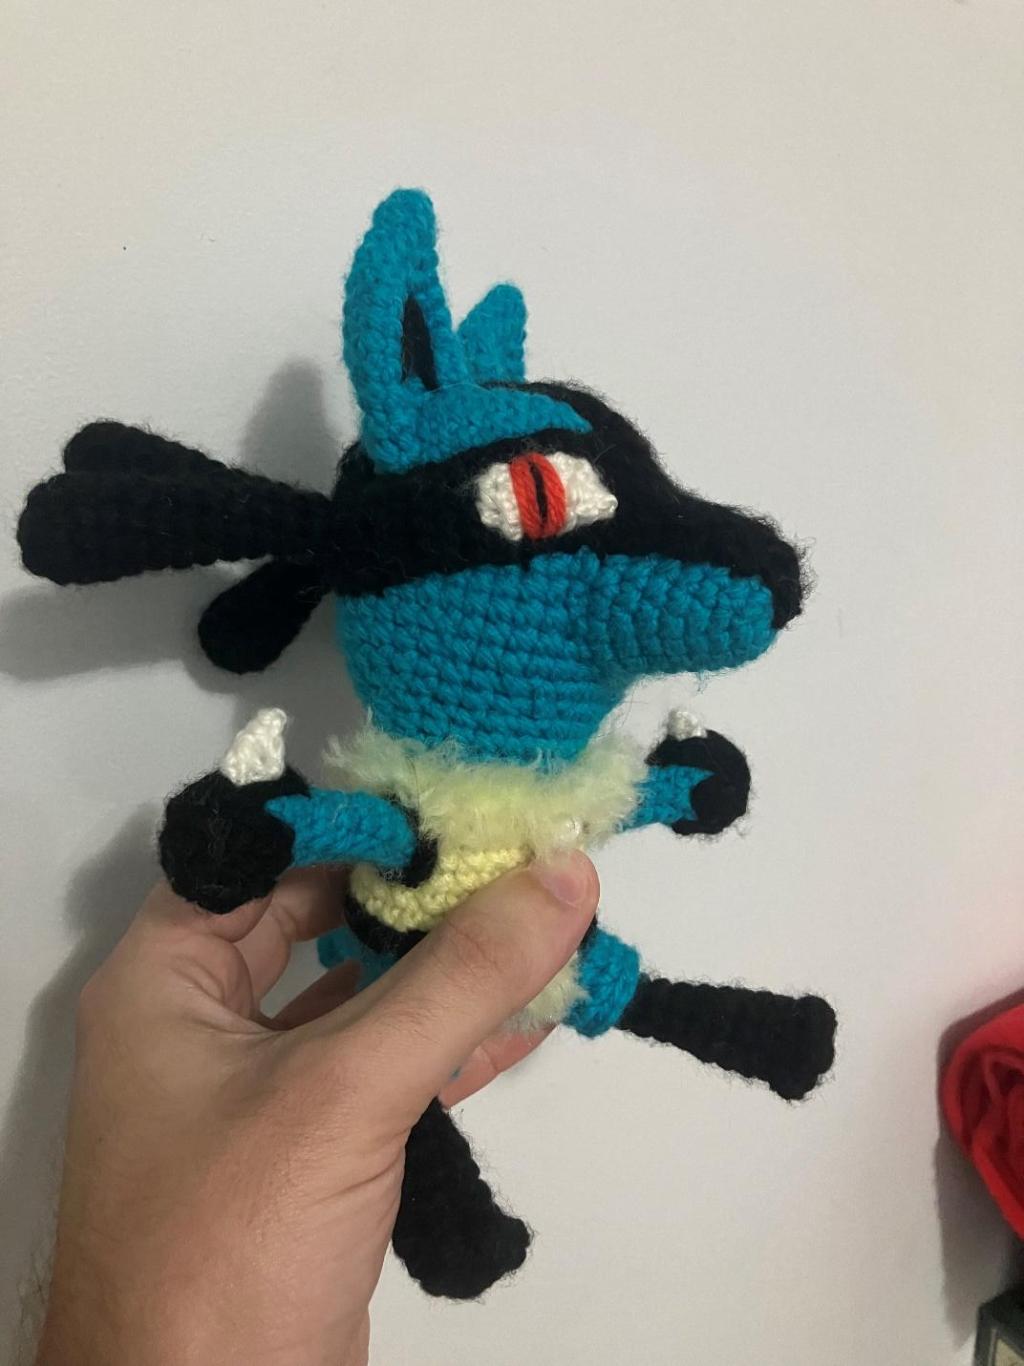
So it’s been a couple months since I last posted. I actually had this finished last month but my brain definitely did some procrastination. The delay was also because I wanted to trial the pattern in chenille yarn. It worked, with some modifications, and I am happy with it, but was way bigger than I anticipated!! In a good way.
Anyway I had someone request me make them this guy and while I know there were some patterns out there at least to me the proportions weren’t matching and I wanted to see if I could shrink the body down and do a similar style to most of my others.
I always enjoyed Lucario on my team. Why? I think because of super smash bros and it kinda gave me Dragonball Z vibes. Was he a favourite of yours?
This guy is definitely not for beginners. It requires your own judgement on fit, completing the puff stitch, being able to crochet direct on the piece and work up from there, colour changing and a bit of sewing and embroidery. So definitely not a beginner, or if you are a beginner take it slow and feel free to reach out with questions! I am happy to assist where I can.
If you want the PDF version which include images then visit my Patreon
Abbreviations (US):
Sc: Single crochet
MR X: Magic Ring with X amount of sc in it
Ch: Chain
ss: Slip stitch
Inc: Increase
Dec: Decrease
HccX>Y: Half colour change single crochet – complete the tower of the crochet in X colour & loop in Y colour
[X Ps]: Puff stitch using X amount of sc in stitch
Hcc-SpX-Y: Half colour change spike stitch – complete tower of crochet by inserting hook into stitch/loop below the current stitch instead using X colour. Pull Y colour through both loops on the hook
R: Round
FO: Finish off
X(…) : Repeat stitches within parentheses X times
X[Sk]: Skip X stitch
Tools and Materials:
- 6.00 mm J/10 Amour Crochet hook
- tapestry needle and scissors
- polyester fiberfill stuffing
- 10 mm safety eyes
- Yarn Colours:
- Light Yellow – Panda Acrocraft 8PLY colour 1018 (Y)
- Light Blue/Aqua – Panda Magnum 8PLY colour 1007 (LB)
- Black – Panda Acrocraft 8PLY colour 1010 (B)
- White – Panda Acrocraft 8PLY colour 1000
- Red (for eyes) – Magnum 8PLY colour 0307
- Note – I have completed this pattern in Chenille Yarn too – it requires slight modifications to the pattern (arms & fluffy fur) so please reach out if you would like these.
Final Size: ~18cm (bottom to tip of ear)
Technical Notes and Gauge:
- If there is something specific about a section I will note it there and it is only applicable to that section.
- Crochet in continuous spiral rounds, unless specified otherwise. Use a stitch marker or piece of yarn to keep track of the last stitch in each round. I usually pull the tail of the MR through when needed as my stitch marker.
- This pattern has colour changes within the row. You need to be comfortable completing these. Remember we swap colours during the stitch before the noted change.
- If multiple colours are used I will note in superscript which colour to complete the crochet in. eg. R1: 12scY, R2: 12scG, R3-5: 12sc = one row of x12sc in yellow, one row of x12sc in green then continue x12sc in green until next noted change. Find the superscript abbreviation in the Yarn section of Tools & Materials.
- If I do not note the colour of a row/crochet assume it is the same colour as the previous row/crochet
- When filling with polyester stuffing, pull apart each large chunk into many smaller chunks. This ensures an even distribution of firmness within the amigurumi.
- Use sewing pins to secure limbs of the amigurumi before you sew them.
- Gauge: 5 rows of 5 sc = 1” x 1” or ~2.5cm x 2.5cm
- Stitch count will be summarized at the end of each row in brackets
Head: Make 1 (Fig 1)
Colours used: Light Blue
- R1: MR 6 (6)
- R2: 6[inc] (12)
- R3: 6(inc, sc) (18)
- R4: 6(inc, 2sc) (24)
- R5: 6(inc, 3sc) (30)
- R6: 6(inc, 4sc) (36)
- R7-12: 36sc (36)
- R13: 6(inc, 5sc) (42)
- R14-16: 42sc (42)
- R17: 6(dec, 5sc) (36)
- R18: 6(2sc, dec, 2sc) (30)
- R19: 6(dec, 3sc) (24)
- R20-21: 24sc (24)
Finish off. Leave enough tail to attach to body
Ear: Make 2 (Fig 2)
Colours used: BlueEar: Make 2 (Fig 2)
Colours used: Blue
- R1: MR 6 (6)
- R2: 6sc (6)
- R3: 2(inc, 2sc) (8)
- R4: 2(inc, 3sc) (10)
- R5: 2(2[inc], 3sc) (14)
- R6: 2(inc, 6sc) (16)
- R7-9: 16sc (16)
- R10-11: 5sc, 7ss, 4sc (16)
- R12: 4sc, 9[sk], ch, 3sc (8)
- R13: 3sc, 3[sk], ch, 2sc (6)
Finish off & leave enough tail to attach to the head.
Nose: Make 1 (Fig 3)
Colours used: Blue
- R1: MR 6 (6)
- R2: 6[inc] (12)
- R3: 2(inc, 5sc) (14)
- R4: inc, 7sc, inc, 5sc (16)
- R5: 16sc (16)
- R6: inc, 9sc, inc, 5sc (18)
- R7: inc, 11sc, inc, 5sc (20)
- R8: 30sc (20)
Finish off and leave enough tail to attach to the head
You need to attach the nose and ears to the head before making the next part as you need to be able to ensure your headband fits your head.
The nose is worked in a kinda square/shape of 5. The sides go straight up and down, the top angles in one sc on each side while the bottom angle in two sc on each side like the image below. Note that the top left corner is utilising the same sc in the nose to take into account the shift from working in the round
Attach the ears toward the back side of the head and ensure they have a curve in them. It should go along the top and partway down the side of the head.
Head band: Make 1 (Fig 4-5) – Complete after you have attached the ears and nose to the head (Fig 14-16)
Colours used: Black
Note: Certain parts of this section may vary depending on ear & nose placement, yarn & tension. Please ensure you check as you are going & fit your band to your head.
In R20-X section complete however many rows it takes for your band to fit snugly around your head with the concave section fitting over your nose.
- R1: 6ch, T, 5sc (5)
- R2 – 10: ch, T, 5sc (5)
- R11: T, 4sc) (4)
- R12: ch, T, 2sc, dec (3)
- R13: T, 2sc (2)
- R14-16: ch, T, 2sc) (2)
- R17: ch, T, inc, sc (3)
- R18: ch, T, 2sc, inc (4)
- R19: ch, T, inc, 3sc (5)
- R20-X(42): ch, T, 5sc (5)
Finish off & attach ends together to create a band
- Attach onto one end of the start of the concave section
- R1: 12sc (12) – finish at other end of concave section. Use stitch markers as a guide for start & end to ensure good spacing of sc
- R2: ch, T, 12sc (12)
- R3: T, 9sc, dec (10)
- R4: ch, T, 10sc (10)
- R5: T, 7sc, dec (8)
- R6: ch, T, 8sc (8)
- R7: T, 5sc, dec (6)
- R8: ch, T, 6sc (6)
- R9: T, sc, 2[dec] (3)
- R10: T, 2sc (2)
- R11: T, sc (1)
Finish off by ch & pulling tight. Leave enough tail so you can tuck away and shouldn’t pull out or weave it into the piece.
The last section is a highly variable section and all depends on your placement of ears. We will be working backwards and forwards as we fill in the back of the head section and create the strip that joins at the front. Before you stress you actually have already generated your rows on with your head and ears (Fig 17). Pin your band in place then count how many sc there are in between the ears and this becomes your first row. Attach on one side of the ears. There is a possibility that this may need to be doubled for you second row. Progressively count your rows up and decrease as needed and prewrite it so you don’t have to check after every row (although nothing is stopping you). When decreasing you want to decrease at the start or end of your row. Decreasing at the start you can just T then start second sc from hook. If your row decreases by one make sure you alternate which side the decrease is on. If it decreases by two you do a decrease at either end. You want to decrease to a minimum of 5 sc. Then do 5sc backwards and forwards until it joins flush with your mouth end.
For my personal ones it usually follows this pattern:
- R1-2: 12sc (12)
- R3: T, 11sc (11)
- R4: T, 10sc (10)
- R5: T, 9sc (9)
- R6: T, 6sc, dec (7)
- R7: T, 6sc (6)
- R8: T, 5sc (5)
- R9-18: ch, T, 5sc (5)
Finish off and connect to the nose end ensuring you keep things even.
Eye: Make 2 (Fig 6)
Colours used: White
- R1: ch7, T, 6sc (6)
- R2: ch,T, 4sc, dec (5)
- R3: T, 4sc (4)
Finish off & leave enough tail to attach to the head.
Hair: Make 4 (Fig 7)
Colours used: Black
- R1: MR 6 (6)
- R2: 6[inc] (12)
- R3-4: 12sc (12)
- R5: 2(dec, 4sc) (10)
- R6: 10 sc (10)
- R7: 2(dec, 3sc) (8)
- R8-9: 8sc (8)
- R10: dec, 6sc (7)
- R11: 7sc (7)
- R12: dec, 5sc (6)
- R13-14: 6sc (6)
Finish off and leave enough tail to attach to the head
Body: Make 1 (Fig 8)
Colours used: Light Blue, Yellow
- R1: MR 6LB (6)
- R2: inc x6 (12)
- R3: 6(inc, sc) (18)
- R4: 6(inc, 2sc) (24)
- R5: 6(inc, 3sc) (30)
- R6: 30sc (36)
- R7: ssLB, chY, 29[HCCLB-Y], HCC-spLB-Y, ssY, chY (30)
- R8: 30sc, ss (30)
- R9: 6(dec, 3sc) (24)
- R10-13: 24sc (24)
- R14: ssY, chLB, 24ssLB (24)
Finish off
Leg: Make 2 (Fig 9)
Colours used: Black
- R1: MR 6 (6)
- R2: 3(inc, sc) (9)
- R3: 3[4 ps], 6sc (9)
- R4-7: 9sc (9)
- R8: 3(dec, sc) (6)
- R9-12: 6sc (6)
Finish off & leave enough tail to attach to the body.
Arm: Make 2 (Fig 10)
Colours used: Black & Light Blue
- R1: MR 6B (6)
- R2: 3(inc, sc) (9)
- R3-4: 9sc (9)
- R5-6: 9scLB (9)
- R7: 3(dec, sc) (6)
- R8-12: 6sc (6)
Finish off and leave enough tail to attach to the body
Tail: Make 1 (Fig 11)
Colours used: Light Blue
- R1: MR 6 (6)
- R2: 6sc (6)
- R3: inc, 5sc (7)
- R4: inc, 6sc (8)
- R5: sc, inc, 3sc, 2ss, sc (9)
- R6: 2sc, inc, 2sc, 4ss (10)
- R7: 6sc, 4[2RFL-sc] (10)
- R8: inc, 3sc, inc, 5[FL-sc] (12)
- R9: sc, 5sc, sc, 5[FL-sc] (12)
- R10-11: 12sc (12)
- R12: 8sc, 3tog, sc (10)
- R13: 10sc (10)
- R14: 7sc, 3tog (8)
- R15-18: 8sc (8)
- R16: 6(dec, 3sc) (24)
Finish off and leave enough tail to attach to the body
Assembly
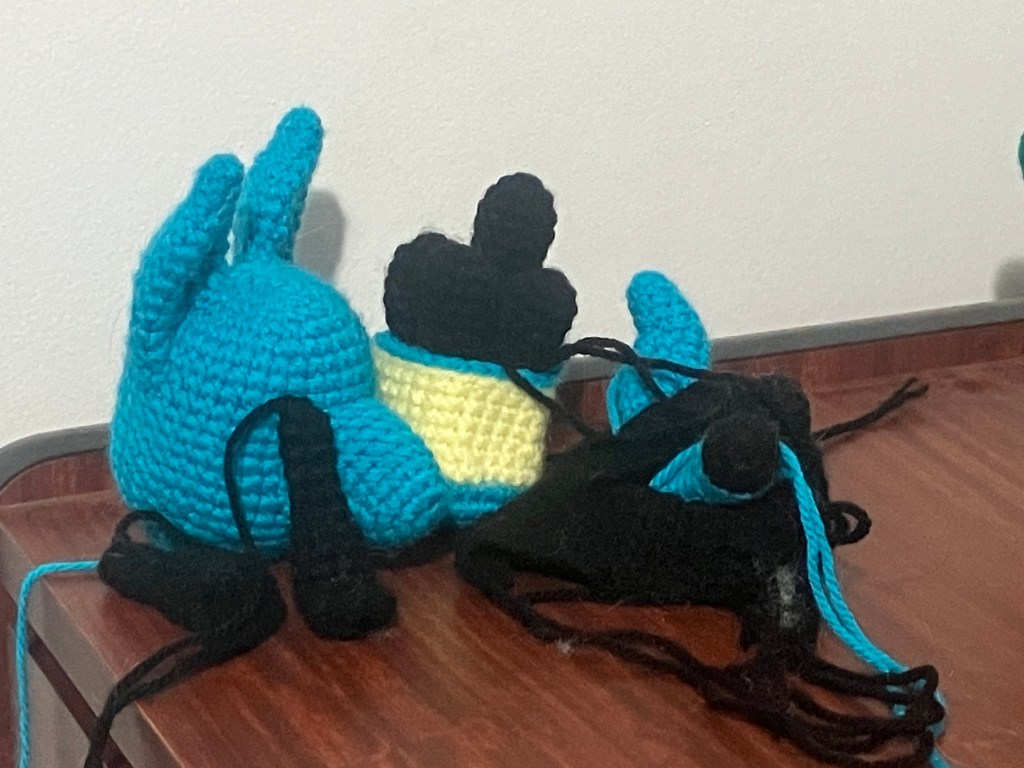
After finishing your head band and all other pieces we can work on the construction. It is best to attach all pieces to the head and body first before joining the head and body together. If you are like me and like using the head as reference point you can attached them prior but it’ll make completing this next section a little fiddly.
I usually place the legs on first. Making sure my toes are pointing up I attach my legs so they cover row 5-6 on the body separated by 7-8sc depending on where they’re being placed. As a reference please ensure you leave at least one blue row of sc on the body visible.
My arms I attach on row 11-12 ensuring there is one free row of light yellow above the arms (Fig 21). There is 9-10sc between the arms.
Finding a central point on the back I attach my tail on row 5-6 too, leaving a row of blue sc above (Fig 22)
The next section is the detailing and why we do this prior to attaching the head. We are going to be completing sc directly on the body using the gaps in between the sc as our attachment points.
Grab your black yarn and attach to your hook in the same manner prior to completing chains. Then complete your first sc using the same attachment points you used to attach the arms to the body (Fig 23-25). There should be approximately 6-7 points which = 6-7 sc around. This should create a ring around the base of the arm (Fig 26). Ss onto your starting sc and finish off. Pull your end and starting tail through the gap between the arm and the ring you have just created, tie together & hide inside the body. Complete for both arms.
For the legs we are doing the same and more with the blue yarn (Fig 23-26). After completing the first row instead of ss into the first stitch we are going to sc and complete another 2 rows for a total of 3 & ss at the end to finish (Fig 27). Hide your tails the same way as the arms. Again I completed 6-7sc around the leg. We are then going to reattach in the sc immediately next to our leg and complete another 3 rows of sc around the leg to add some thickness. This time there was a total of 10-11 sc in a row. Once you complete the last row you are going to complete a row of ss but make sure you attach the two rings together (Fig 28).
Next we are going to complete the black belt. Attach onto the back using the bottom of the last blue row on the body and start making your way around. You may have to curve slightly to get over the legs but that is fine. When you get onto the front ensure you create a slight downwards curve to the groin to create some space for some fluff (Fig 29). Ss back onto your first sc when you get back to your starting point (Fig30). Then using a threading needle attach it to your body using the bottom of the first yellow row (adjust for the front section).
Working on the arms you can leave the natural colour change spike effect if you struggle with embroidery or you can create your own. I prefer to make my own as there is a large spike on the pattern which has the metal spike coming out. This requires making a series of triangles through embroidery. I would recommend that when doing the base of the triangles you use the 2nd row of the arm as opposed to the 3rd – 4th. It creates this more natural rounded shape (Fig 31-33).
Once completed you can work on the spikes. There is one on the chest and one on each arm. For the chest find the central sc on the 10-12th row and you are doing a circle of 4 sc using the four corners. Then complete 2 dec before finishing off and weaving the tail down one side and hiding in the body. Do not pull tight as it will deform your spike (Fig 34-35).
Next we need to add the “fur” around the neck and groin area. Cut small strands of your light yellow and pull the middle of the yarns through the top yellow layer of the body. Then pull the two ends through the loop on your hook and tighten. Once you have gone all away around the top of the body you also want to attach some to the groin and partially down the sides of the arm bands. Trim your strands down to a suitable size. Next grab your metal brush and brush a your strands out. After you may need to trim again (Fig 36).
Once your body it complete we need to finish the head. Attach your headband if you have yet to do so, then place your hair pieces along the back portion (Fig 37). I usually place mine in between the ears and space them evenly.
Attach your eyes. I recommend pinning them first to get an idea of where they look best for your Lucario before attaching (Fig 38). To complete the iris and pupil you will need your red and black yarn. In a central spot on your eye complete a line of black on each eye. Then using your red yarn we are completing two strands of red on each side using the same holes you used for the black yarn and it should help curve the colour to give it move oval a shape (Fig 39-41).
Last for the head complete the embroidery for the ears. It’s an upside down V. Make sure that they are even on each ear (Fig 42).
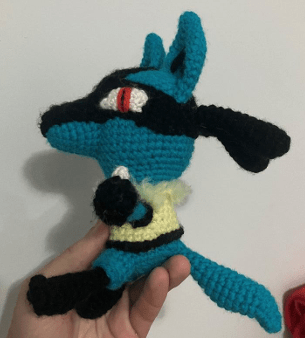
Once you’re done attach your head to the body,
Lucario
is all done! I hope you enjoyed crocheting it and found the pattern helpful. I would love to see your finished amigurumi, so share a picture on social media with me by tagging me @dans_crochet_adventure. Once again, if you have any questions don’t hesitate to reach out to me through email at danscrochetadventure@gmail.com or reach out to me on my socials. Happy crocheting!

Leave a comment